A User Defined Function (UDF) which can split data into multiple Rows or Columns on the basis of the specified delimiter in Excel is explained in this blog post.
Watch the video on Excel Formula to split data into Columns or Rows
Text to Columns feature is the most commonly used Tool to split data in Excel. As far as output is considered this method is an efficient one. But when there is a change in the source data, we need to the repeat the process again.
A Function or Formula which updates automatically will be the perfect solution for this task. The Splitter function explained in this blog post can split the data and will update for the changes in the source data.
Table of Contents
User Defined Function called Splitter
To create a User Defined Function called Splitter, open the VBA Editor of Excel and type in the following code.
Function Splitter(Data As String, Separator As String) As String()
On Error Resume Next
Splitter = Split(Data, Separator)
On Error GoTo 0
End Function

Explanation of the code
Function Splitter(Data As String, Separator As String) As String() - Line 1
Splitter is the name of the string function which will accept two strings ‘Data’ and ‘Separator’
On Error Resume Next - Line 2
This statement is to handle errors. In case of any error (run-time error for example) control goes to the next statement.
Splitter = Split(Data, Separator) - Line 3
Split function is a VBA function that will split data on the basis of the specified delimiter. Here, Data is the variable which refers to the text to split and Separator is the variable for the delimiter.
On Error GoTo 0 - Line 4
Disables any enabled error handler in the current procedure.
End Function - Line 5
End of the function
How to use Splitter
After creating this UDF called Splitter, when we type in the first few letters of the same, this function will appear in the list of suggestions.

This new function will accept two arguments ‘Data’ and ‘Separator’. Data refers to the text to split and Separator is the delimiter.
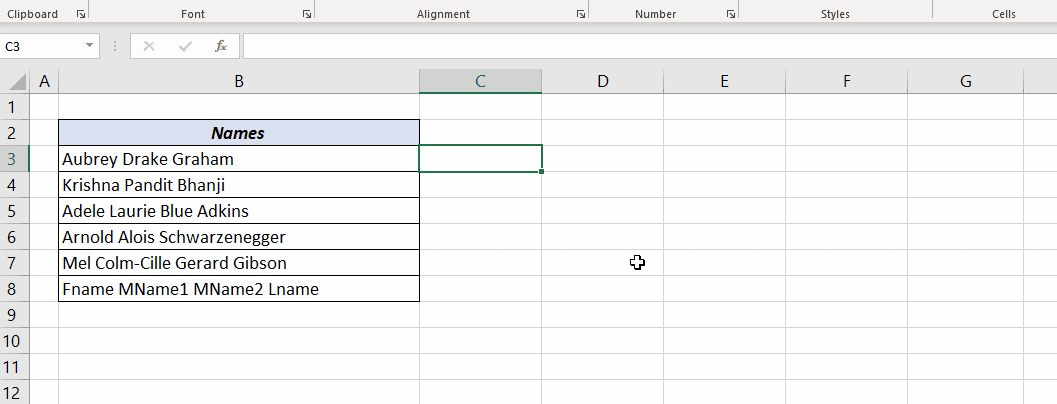
In the following example, I have used this Splitter function for splitting a name into First, Middle and Last Name on the basis of the ‘Space’ character separating them.
When ‘Aubrey Drake Graham’ is given into the Splitter function, it spills ‘Aubrey’, ‘Drake’ and ‘Graham’ into 3 different columns.
=Splitter("Aubrey Drake Graham"," ")
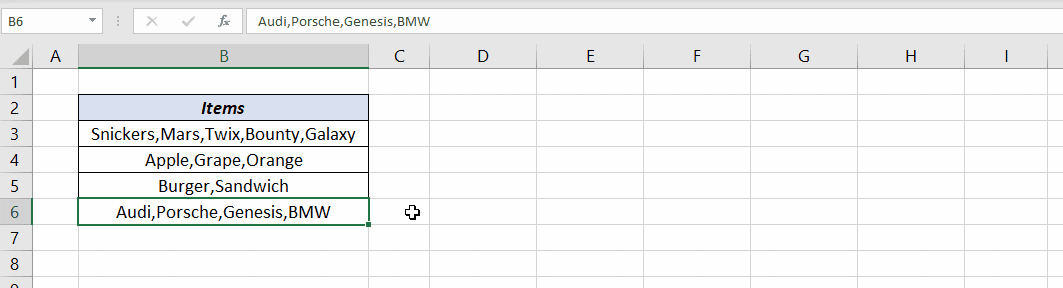
Another example where Splitter function is used to split data separated by comma.
By combining it with TRANSPOSE function, Splitter function can be used to split data into multiple Rows.
This spill behavior of Splitter function will be available to those whose have access to the new Dynamic Array Formulas (Office 365 Subscription).
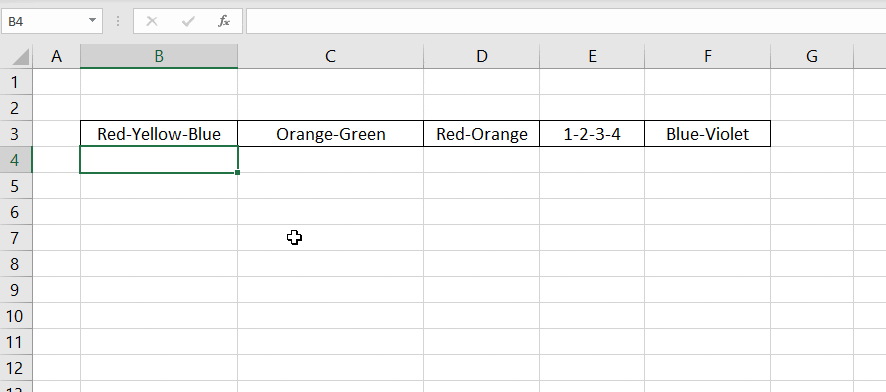
Those who are using Excel 2019, Excel 2016 or earlier versions of Excel which doesn’t support Dynamic Array Formulas can use another version of the same function.
Another version of Splitter Function
Function Splitter2(Data As String, Separator As String, Item As Integer) As String
On Error Resume Next
Splitter2 = Split(Data, Separator)(Item - 1)
On Error GoTo 0
End Function
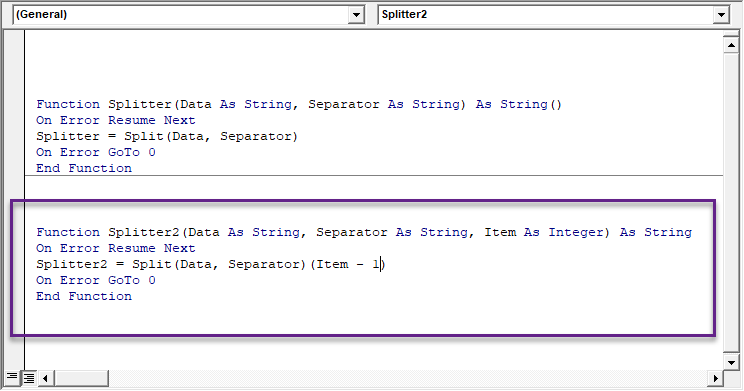
In this function called Splitter2, we have introduced one more variable called ‘Item’ which can be used to refer the index number of the item to return.
Splitter2 will accept 3 arguments ‘Data’, ‘Separator’, ‘Item’ and return the item from the specified position.
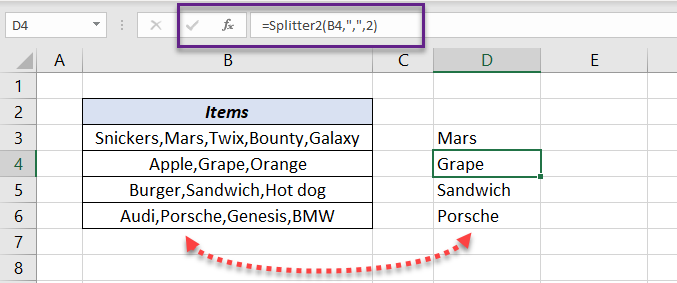
In the following example, I have used Splitter2 function to return the second item from the Text string ‘Snickers,Mars,Twix,Bounty,Galaxy’
=Splitter2("Snickers,Mars,Twix,Bounty,Galaxy",",",2)
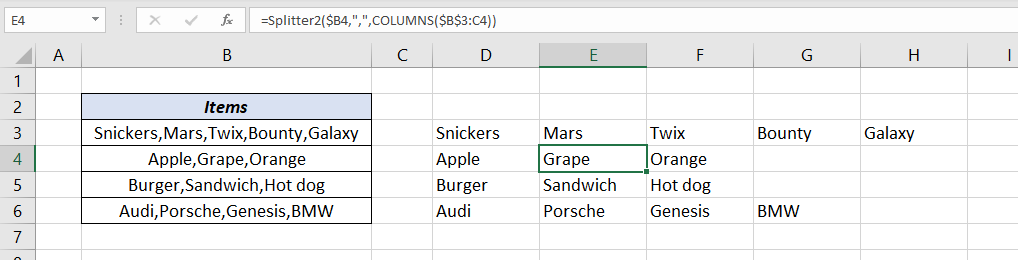
To split data into multiple columns we need to combine Splitter2 with COLUMNS function.
=Splitter2($B3,",",COLUMNS($B$3:B3))
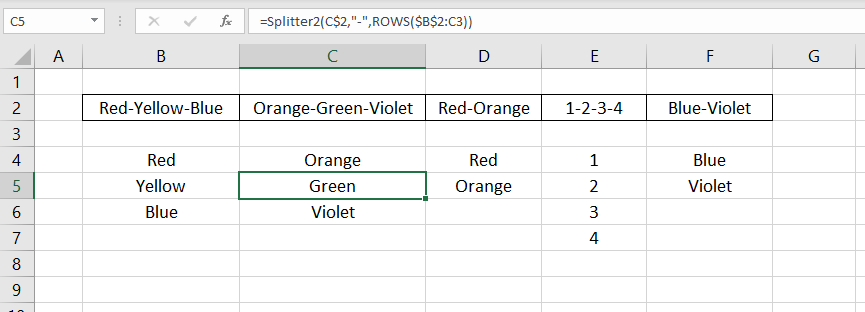
Similarily, to split data into rows we need to combine Splitter2 with ROWS function.
=Splitter2(B$2,"-",ROWS($B$2:B2))